
Have you thought about having a Thanksgiving parade with your upper elementary students to celebrate Thanksgiving, but aren’t quite sure how to start? The decorated balloons on everyone’s Instagram feed look cool. You know your students would enjoy it, but you’re concerned about the materials needed, the time commitment involved, and how to keep this project educational. These ideas will honor the fun of the Thanksgiving parade tradition while still focusing on academic standards.
Please note that some links in this post are Amazon affiliate links. If you click and make a purchase, I earn a small commission at no extra cost to you. Thanks for helping support the site!
Learning About the Parade
Parade Background
If you have never looked into the history of the Macy’s Thanksgiving Day parade, it is quite a tale. The Macy’s Thanksgiving Day Parade began in 1924 when Macy’s department store held a Christmas parade in New York City to celebrate the holiday season. It featured live animals from the Central Park Zoo and ended with Santa Claus arriving at Macy’s. In 1927, the first giant balloons, like Felix the Cat, replaced the animals and became a favorite part of the parade. The event grew more popular each year, with radio and later television broadcasts allowing people across the country to enjoy it. After pausing during World War II, the parade returned in 1945 and continued to add new features such as marching bands, Broadway performances, and famous character balloons. Today, it attracts millions of viewers and marks the official start of the holiday season for many families in the United States.

Balloons Over Broadway
If your students are interested in learning more about how the parade comes to life, they may enjoy reading or listening to the book Balloons Over Broadway by Melissa Sweet. It is a picture book that tells the true story of Tony Sarg, the puppeteer and artist who created the first giant balloons for the Macy’s Thanksgiving Day Parade. The book explains how Tony loved to invent and design things that moved, and how his creativity led him to design huge, helium-filled balloons that could float through the air instead of using live animals in the parade. It illustrates how Tony’s imagination and problem-solving changed the parade forever, turning it into the spectacular event we know today.
Additional Research
Students may also be interested in researching the parade or the science behind balloon construction on their own. The Macy’s website, History.com, Britannica, and the Library of Congress are all good sources to find more information. Students can use the Depth and Complexity icons to move beyond surface facts and think deeply. Here are some questions to consider when researching:
Language of the Discipline
- What special words or terms are used in parade planning, balloon design, or float construction?
- How do announcers and reporters describe the parade to the public?
Details
- What materials and techniques are used to make the giant balloons?
- How many performers, floats, and balloons are usually in the parade?
- What steps are taken to keep the parade safe for spectators and participants?
Trends
- How have parade balloons changed over the decades?
- How has the size, route, or timing of the parade evolved since it started?
Rules
- What rules must balloon handlers follow during the parade?
- What regulations does the city enforce to keep the parade running smoothly?
Ethics
- How do organizers make decisions about which companies or characters are included?
- Are there controversies about representation, commercialization, or animal involvement in the parade?
Big Ideas
- Why is the Macy’s Thanksgiving Day Parade considered an important American tradition?
- How does the parade bring together art, business, and community celebration?
Multiple Perspectives
- How might a balloon designer, a performer, and a spectator experience the parade differently?
- How do local residents along the parade route feel about it compared to tourists?
Changes Over Time
- How did the parade adapt during major events, like wars or the pandemic?
- How has media coverage (TV, internet, social media) influenced the parade?
Academic Standards
ELA Standards
An additional ELA tie-in is to have students design a float representing a favorite character from a book. They then create an accompanying poster that identifies the character’s traits, motivations, and relationships. This is a great way to share their favorite books with classmates, think deeply about the characters, and find new books they want to read, all while having fun. If you are looking for a way to try this project with older students, Rhea, a high school ELA teacher from Idaho, is planning to create a parade based on Shakespeare’s Julius Caesar where the floats reflect a character from the play and the design reflects that character’s leadership style (Cassius is bitter/jealous of Caesar, Brutus is honorable and noble, trying to work for the people, etc.). She goes on to say, “I like the tie-in with the parade for Caesar at the beginning.”
Math Standards
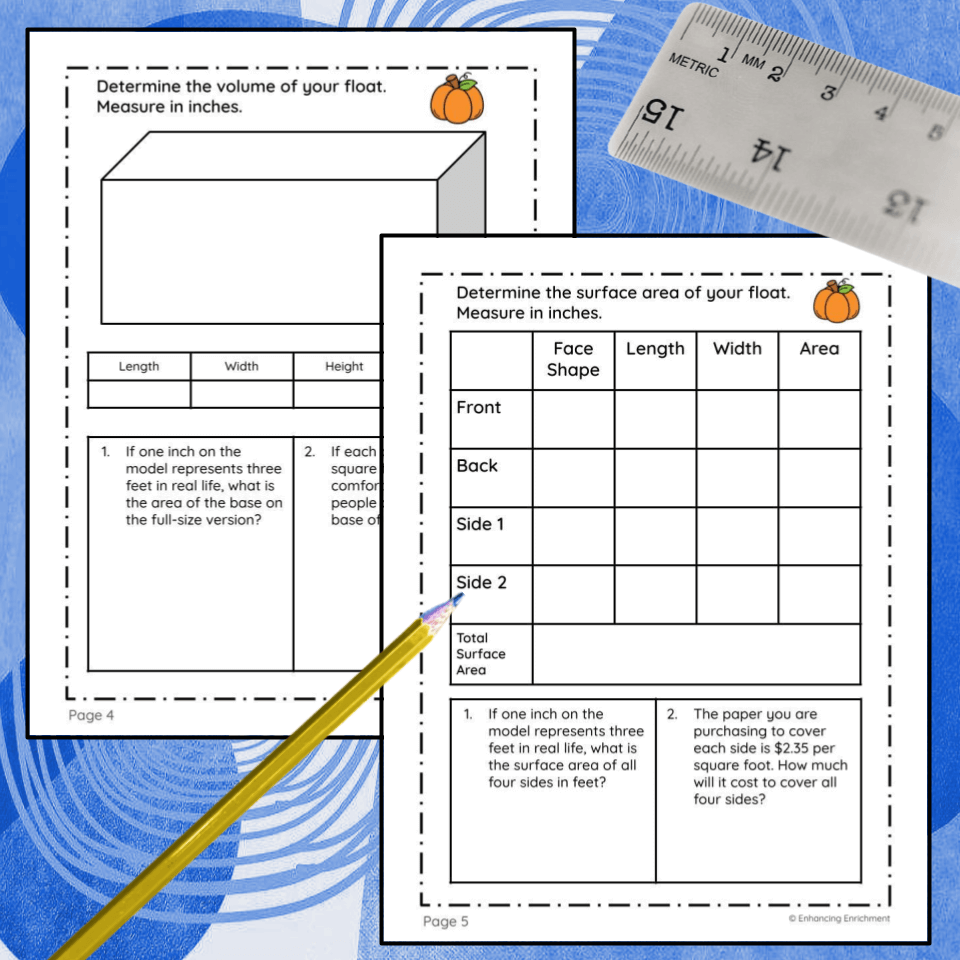
You can incorporate math into the parade float project by giving students a budget for their materials and having them make choices about what to buy. They’ll practice adding, subtracting, and comparing prices while deciding how to spend their money. For example, students have a budget of $100.00. The base and wheels cost $45.00, but students must decide between extra decorations of varying costs.
After building their floats, students can figure out the volume and surface area of their floats. They might also measure area and perimeter for flat decorations. It’s a fun way for kids to see how math connects to real-life planning, designing, and problem-solving.
STEM Standards
“In Science, the STEM process is followed to design balloons,” K.S., fifth-grade teacher. Students can follow the engineering design process to ask, imagine, plan, create, test, and improve.
Ask: Identify the challenge. How can your float represent a character, theme, or idea? Consider materials, size, and movement.
Imagine: Brainstorm creative ideas for design, colors, props, and decorations.
Plan: Choose one idea and make a blueprint, list materials, and decide how to build it.
Create: Build the float using your materials, bringing your design to life.
Test: Check if it rolls smoothly, stays together, and clearly represents your character or theme.
Improve: Make adjustments to fix problems or enhance the design.
Creating Your Own Parade Floats
There are lots of options when it comes to designing your own parade floats. While the most common option is to decorate actual balloons, you can also create floats from cardboard boxes, foil, or cardstock.
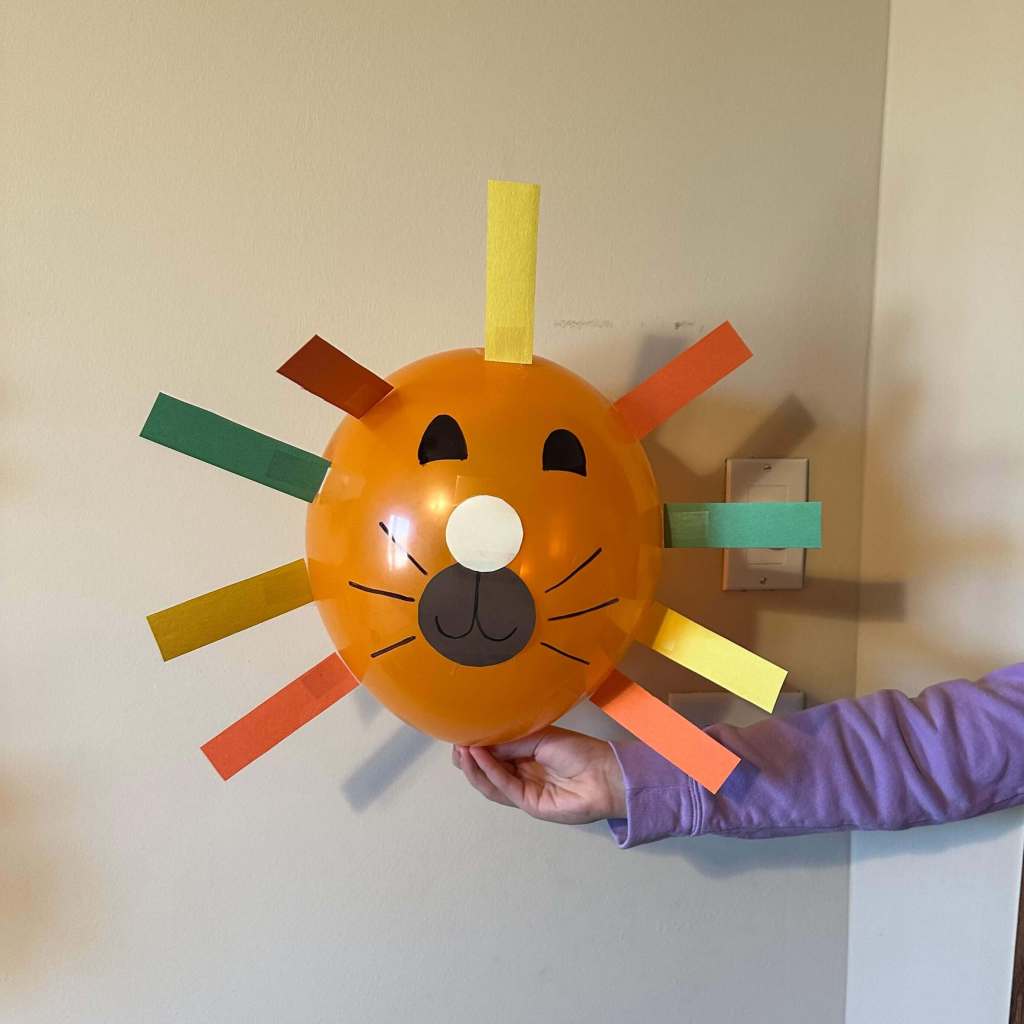
Balloon Floats
Creating a festive parade float with balloons is a fun and colorful way to bring designs to life. You’ll need regular balloons or large stretchy balloons (like these punch balloons), construction paper, markers, tape or string, and optional decorations like stickers or streamers. Start by inflating the balloons. Some will pop, so it is helpful to have extras on hand. Then, use construction paper and markers to add characters, signs, or other themed decorations. You may want to attach the balloons to a ruler or paint stir stick to make them easier to hold and display.
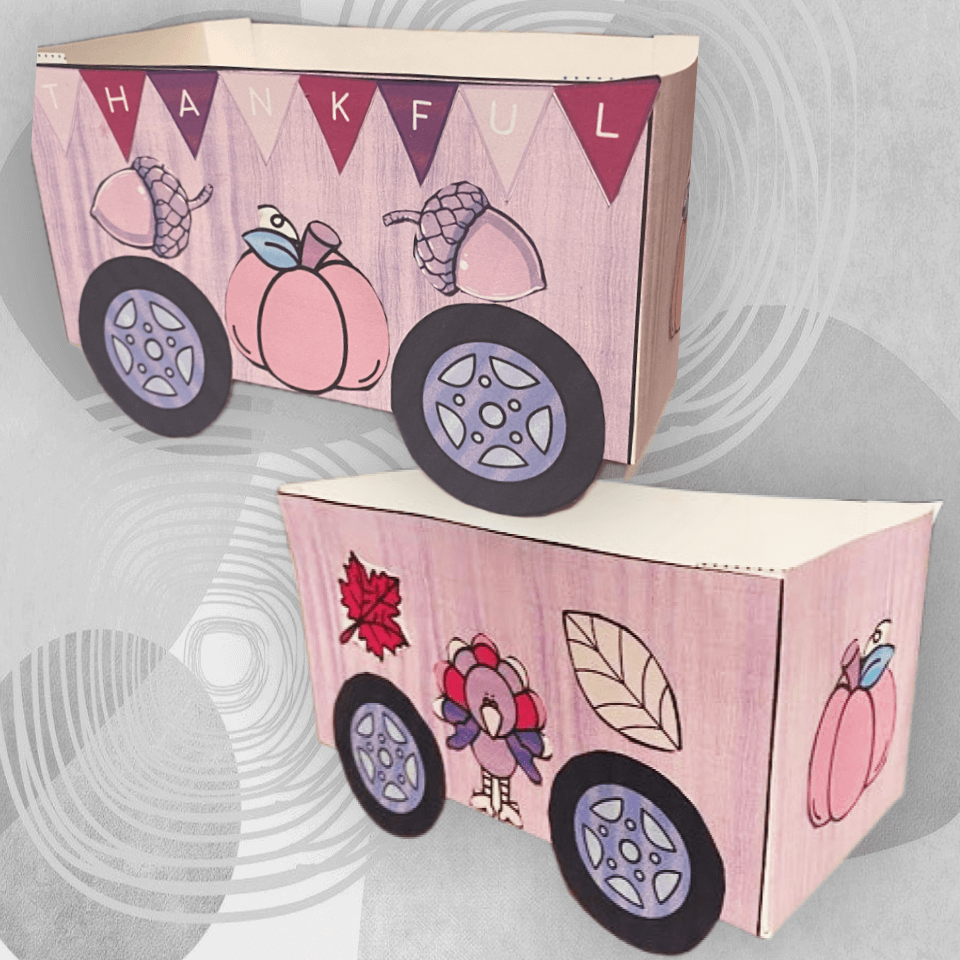
Cardboard Boxes
Creating a parade float out of a cardboard shoebox is a fun and simple hands-on project. You’ll need materials like a shoebox, cereal box, or small cardboard box, construction paper, markers, glue or tape, scissors, and any additional decorations such as stickers, pipe cleaners, or small figurines. To construct the float, start by covering the box with construction paper or coloring it with markers to create a base. Then, cut and attach decorations to bring your design to life. Add paper characters, props, or signs to represent your theme. Encourage students to be creative and think about how to make their float three-dimensional while keeping it sturdy enough to display or roll along a parade route.

Aluminum Foil
Created by Audrey H., a GT and STEM teacher from Texas, this foil balloon activity lets students create their own three-dimensional designs based on their favorite book character, sport, or hobby. Each student receives two large sheets of aluminum foil and can choose to decorate one or both sides. If they choose both, they need to make mirror-image designs so that when laminated, both sides appear correct. Students begin by sketching their design on scratch paper and then lightly drawing it onto the foil. Using colored Sharpie markers, which adhere best to the foil, they fill in their designs. The foil is then cut out with about an inch of extra space around the edges, stacked, aligned, and run through a laminator. Extra lamination and reinforced tape around a hole allow a string to be added without ripping. Finally, a small “V” is cut at the bottom so a straw can be inserted. Blow up the foil balloon, quickly release, and seal it with heavy-duty packing tape. They can then hang from the ceiling. While the balloons aren’t always perfect, the process is highly engaging, creative, and a memorable hands-on STEM experience!
Cardstock
If you are looking for an easy-to-implement version, this printable Thanksgiving Day parade project gives students everything they need to cut, fold, and glue cardstock pieces to create their own three-dimensional float. It’s ready to print and use, making setup quick and easy. Using the provided materials, students design and construct their floats while staying within a set budget, encouraging them to make strategic choices about decorations, size, and overall design. This hands-on activity combines creativity, planning, and problem-solving as students work to build the most well-decorated float possible on a budget.
The Parade
You also have options with the actual parade. Students can hold their balloons as they walk down the hallway, create wheels for their boxes or cardstock floats, attach them to robots, or project them on a green screen.
Classroom Parade
One of the easiest ways to share your parade is to have your students hold their floats and carry them through the hallway. Ask to visit the classrooms of younger students. Both the participants and the audience will love seeing the different floats and pointing out characters that they recognize.
Students can also create movable parade floats by creating a simple wheel and axle system. Begin by gathering four plastic bottle lids to serve as the wheels and two sturdy straws to act as the axles for each float. Use a push pin, thumbtack, or a drill bit to carefully poke a hole through the exact center of each bottle lid to allow the straw to pass through smoothly. (A teacher or adult should complete this step for safety.) Next, slide one straw through two of the lids so that there’s one wheel on each end, making sure the lids spin freely. Repeat this step for the second set of wheels and straw. These two straws with attached wheels can then be taped or hot-glued securely to the bottom of the float or parade base, keeping them parallel and evenly spaced so the float rolls straight.
If bottle lids aren’t available, you can substitute cardboard circles, foam discs, or large buttons for the wheels. Wooden skewers, pencils, or chopsticks also make good axle alternatives. For a sturdier build, try using wooden dowels with LEGO wheels or recycled toy car wheels. Once assembled, students can test their designs and adjust spacing or alignment so the wheels spin smoothly.
Robot Parade
A fourth-grade enrichment teacher from Illinois states, “After designs were complete, the parade was underway by the use of Ozobots.” If you have access to Ozobots or other small programmable robots, a great technology extension is to attach the balloons to the robots and program the robots to follow a set “parade” route. Ozobots are programmed with determined paths drawn with markers. Students draw paths using black lines and then add sequences of red, blue, and green color codes directly on the track. Each color combination gives the Ozobot a specific command, such as turning, spinning, pausing, or changing speed. Students can connect their paths with each other to practice spatial reasoning, collaboration, and creative problem-solving while building longer, more complex parade routes.
Green Screen Parade
The easiest way to create a green screen in the classroom is by preparing a simple green backdrop. You can use a plastic tablecloth, fabric, or bulletin board paper. Record your parade videos with students walking or posing their parade floats in front of the green screen. Then, open the Do Ink app ($4.99) or a similar Green Screen background app. Import your video onto the first layer, and add your chosen background image or video on another layer. The app automatically replaces the green background with your new scene, creating a fun, customized parade video you can save and share.
Other apps that may work for video editing include WeVideo, Canva, or the iMovie app.

Bringing a Thanksgiving parade into your classroom is a fun and meaningful way to celebrate the season while keeping students engaged. From designing creative floats to coding parade routes or recording green screen videos, kids get to learn through teamwork, problem-solving, and imagination. It’s an engaging activity that blends creativity and learning and one your students will remember long after the parade is over.
If you’re looking for more Thanksgiving activities, check out the Thanksgiving Activities for Elementary Gifted and Talented post for a wide variety of engaging options.


Leave a comment